The Slip Method - Slip Holders
Page created: 23 February 2009, updated 29th January 2010
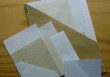
Slips need to be held in some way which displays them well and keeps them safe. There are a number of ways they can be held, and here I will show a card which can be used to keep a slip list. It can be loose for mobility, or it could be glued to some board as part of an organiser. The card can be colour coded, if desired. The card I used was an off-cut I got from a printer's shop, about the weight of a greeting card. The clear plastic is a strip cut from a report cover. You could also use a flat piece of plastic from blister packaging, overhead projector acetate (won't allow dry-wipe pen to be wiped off) or lamination pouches (perhaps a little thin).
To allow the slips to be slipped under the edge more easily, I score the plastic just a few millimetres in from both edges, by running a bone folder or empty ballpoint pen along a ruler over softish card or a magazine, which has some give. This will make the edge curl up.
When marking the card for the stitching, allow a little more width than the slip, which makes it easier to insert the slip, and also allows several slips to be held in one partition to create a mini stacked list (e.g. related jobs done in sequence or same context).
Hold the plastic down firmly when pricking the first set of holes, or clamp part of the strip with something like a Rapesco clip or similar. Once the first holes are made, start stitching, tying off the first stitch as you come back out on the back. Allow enough thread to do the full length plus some. Prick from the front, using a softish underlay, like a magazine or card, maybe overlaid with some cloth or paper towel, to let the needle come through the back. I use a stout drawing pin, and hold it in a pencil extender to save pressure points on my hands when doing a lot of stitching. The drawing pin is just the right size for the job. There is no need to make more than a few stitches to hold the plastic down. Keep the stitches big enough to prevent tearing. After doing the last stitch tighten the slack along the entire stitching before finishing off with a few buttonhole or similar stitches or knots. Loop the ends around a few stitches and secure with a dab of white glue.
The back can be covered with more card for a neater finish, maybe with a pocket for spare slips or more job slips in the pipe line. The card could go into a mini folder or wallet to carry in a pocket.
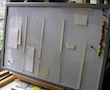
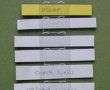
The above card shows a few sample slip types and a stack of slips in one compartment. The black-edged slip is for deadlines (memory aid: deadline - funeral - black strip, morbid, I know, but it works), the red lined slip is for specific date items, e.g. appointments, birthdays etc. , and the red slip is a flag for "must do" or "important". It serves the same purpose as the magnets on the board. The plastic will also happily take sticky flags and could be marked with meta data with a non-permanent marker where the extra data may be variable, like changed priority. The slip list can easily be re-organised, and completed jobs literally pulled out.
Click thumbnails to enlarge, click popup to close
Rapesco clip and dispenser, pin and scorer (empty pen)
scoring the plastic strip
card and scored plastic strip
Marking the card
First stitches
Progressing down the card
Stitch sequence seen from back
Pulling up slack
More slack accumulating
Tied off at the back
Finished front
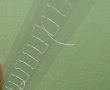
When displaying slips or other small pieces of paper on a magnet board, the clear plastic strip with curled lip held down with a strip of magnetic material (like fridge magnet material) is also very useful. I have a bunch of these strips which I can move around the board, add or remove. Great for doing a sorting job, perhaps for a writing project.
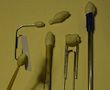
And when moving around micro slips in a brainstorming session, a little pick-up tool made from a toothpick or other thin object with a bobble of poster putty or blue/white tack works great. A light dab with the magic wand picks it up, and a slight twist of the wrist deposits the slip. Video to follow, meanwhile a photo of said wand.
Update
Here are a few more photos of a reversible slip list holder which I use as a reusable to-do and check list for writing posts (one of several). When I have done an item I just turn the slip around, and once all the jobs are done I can use the list for the next job without having to turn each slip around again. I just flip over the entire list, as it is made of two strips of clear plastic. The header is in a different colour and has the same writing on both sides, so it doesn't need turning around. This system can be used for any type of check list or repeat to-do list. I populate the list with every item that is ever likely to be needed for a particular job I repeatedly do (like writing a post), and just flip the slips that are not needed at any one occasion at the start of the session. For example, on the post writing list I would have an item for images, but if the post I am writing does not require an image, I flip the image slip over before starting the job.
Some magnet backed holders for mini slips, made with self-adhesive photo corners. I use these for brain storming and work flow or idea organising. Before removing the photo corners from the backing strip I lightly scored a line near the edge with a bone folder to form a lip as I did for the long strips, to make it easier to insert the slips. This can be done with a spent ballpoint pen. The last photo just about shows the scored line.
colour-coded magnetic mini slip holders

Xyron magnetic sticky tape, photo corners and mini slip holders
mini magnetic slip holder up close
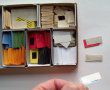
Here a slip album, a few expanding slip organiser books and some slash pockets. The first one was inspired by old-fashioned stamp albums, the kind which has translucent parchment paper strips to hold the stamps. I stuck some strips of tracing paper onto card. It is a somewhat crude job, as it is difficult to glue the strips, as they curl a lot when damp, and glue sticks are not very precise. So I went for sticky tape after a few clumsy results with the glue. This album is for holding little cutout images, inspiration thumb prints I printed out from things I've seen on the internet, or bits from catalogues and more. It is used like a scrap book, but can be reorganised, and I can short list some ideas by removing the little images and group them together until I am happy with the choice. That may be for different elements for one project. This is my idea bank.
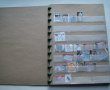
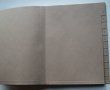
The expanding sorting books are made from thin manilla folders. I cut away one side, only leaving a thin strip, and glued the next cut folder to that strip, and so on. Difficult to describe, better to work out from the photo. I did not glue to the edge, which leaves room for expansion. The first of the set is made from the cut off pieces of the larger books, and is A5 size (half letter). It has 12 sections, which I use for receipts and such, sorted by month. The larger, coloured ones have a piece of coloured card as a cover, and coloured sticky notes for tab labels. There are four colour coded books with ten sections each. I use them for keeping notes for my book project which is in four main parts. Another plain version holds notes for additional material.
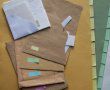
The slash pockets are just cut down used envelopes, which are very handy to sort, organise and store various slips and notes. I also use small ones like large writeable paper clips.
Idea bank made with pockets as in stamp albums
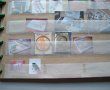
some inspiration pictures I printed as thumbprints, could be idea building blocks
expanding sorter
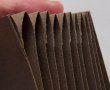
expanding sorter - spine structure close-up
colour-coded A4 expanding sorters and slash pockets for collecting slips
small and medium slash pockets for collecting slips