The Slip Method Hardware - The Slip
Page created: 28 April 2006
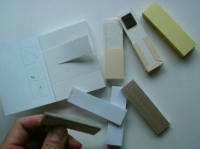
Selection of slips
One of the main aids to organising in the slip method is - you've guessed it, the slip, more specifically the action slip. The little work docket is transient, passing through the system temporarily. It pauses along its route and is given additional information; the where, how, when, who and what. Its behaviour is ordered but flexible. It carries a unit of information and is a building block. Detailed description of the process, and how to make or obtain a supply will be found in later chapters. Lets follow it on its journey. It can start from several places. The blank slip is either loose or padded up and resides in a dispenser, a small pocket case, on the desk, the fridge, memo board, bedside table - wherever you place a quantity in readiness. It may even be torn or cut from any handy source of paper. All actions are written in brief on the slip - one action, one slip. Just remembered something that needs doing? Write it on a slip. Just received a bill? Write 'pay bill (and details like who)' and either file the bill if payment is made from source, or place in bag/briefcase if paid away (e.g. at bank or merchant). No more cluttered in box. Anything that needs to be acted on goes on a slip, unless it is a quick job that can be done straight away (see more on that in David Allen's Getting Things Done, or read introductions to GTD on the web).
Actions to be carried out soon go on the to-do board (which can be as simple as a piece of card inside your planner, with pockets for holding the slips in place), or in the tickler for later action. An action slip may also be generated by a project, but after it leaves the project folder/board it is dealt with in the same way - either to-do board, or tickler, from where it will be moved to the to-do board at the appropriate time. On the to-do board the slip is given extra information with colour codes, symbols, and/or pictograms. The list can then be scanned and certain jobs can be filtered out according to circumstances. Once an action is completed the slip can either be discarded, recycled (if pencil was used lightly, or the back, if blank) or put into a journal as a reminder, or archived in some other way with a brief note if necessary (e.g. 'done' and date).
Size and Proportion
The size and proportions are a matter of preference, but as a rough guide 15 x 60 mm (approx. 1/2" x 2 1/4", roughly the size of a Post-it flag or bookmark) would be a handy size, large enough for ease of handling and visibility, but not so big as to waste resources and demand more space. If your work process requires you to add more data to the slip you may need to up the size a little. Uniformity, to within a few millimetres, is desirable, as it can be slotted into its allocated place more easily and allows more efficient scanning. A great variety of shapes and sizes would be distracting to the eye when trying to filter out information through focus on difference. That attention should only go to the codes. Standardisation allows for a more fluent passage through the system. If you are cutting the slips (or are having them cut by a print shop) from standard letter/A4 sheets the slips dimension should be of a size to fit the sheet without waste and approximate the size you choose. The same applies to sticky pads which are cut to size. Other considerations in choosing the right size is available space, eyesight, handwriting and how much additional information is regularly added to the slip. Experiment with a few sizes until you find one that is best suited. By keeping to the same size and allocating that size to the action slip only, you have already started the filtering process. Seeing an oblong slip, you know it is something to act on.
Text and Text Position
The information should be brief and actionable, or a very obvious prompt to action. If 'rubbish' obviously means 'carry out rubbish' there is no need to write the action, just the prompt. You can also add brief details like date, telephone number, who, reference number or back-up location. A tip for repeat actions: write it more neatly or even draw a little picture, e.g. a little dustbin (trash can) so that when the action is completed on this occasion, the slip can be reused, and moved forward in the tickler to the next scheduled or estimated date, as the neatness of the text or the image tell at a glance that it is a repeat job, and how to deal with it.
The information should go to one end of the slip, leaving about 1/3 to 1/2 blank so that the information is not obliterated by the magnet or any opaque slip pocket. Some additional information, like a telephone number can go into the covered space, as it need not be visible for the scan. It could even go on the back of the slip. If you are left handed write on the left which makes it easier to insert the slip into a slip pocket, and visa versa if you are right handed. If you are Japanese then write on the top of the slip if the slip is to go into any pocket. If you only use magnets to hold the slip, then you could write top or bottom. Vertical writing allows the slips to be more easily displayed on a pin board as the slip would hang and still be readable, in which case it would be best to write at the bottom. Again, consistency helps in the handling and scanning process. The fluent working of the system depends on some presence of mind (did you think of grabbing a slip?) and adherence to organisation (slip availability, placing the slip in the appropriate place or a designated holding area - a mini 'in box' - as soon as it is generated).
Types of Slips
Slips can be non-sticky (standard) or sticky notes, with standard notes either loose or padded up. Standard slips are on the whole easier to handle, cheaper and more accessible. Stickies have some advantages over standard slips, and if you love your Post-it notes, you'll find it easier to adopt the slip method with stickies, though they are not used to plaster every surface, and certainly not haphazardly. Blank sticky slips can also double up as cheap flags and book marks. I use standard slips for actions, and sticky notes for mapping diagrams. Loose standard slips are the most basic, all you have to do is cut and stack or slip into a dispenser. Unless you contain them in some way, or place them in the system straight away, they are, however, vulnerable to being easily scattered, and are not as easy to contain for portable cases as pads. Dispensers and pads are easy to make though (chapter to follow), and there is room for both in the system.
Source
The slip is so small that it can be cut on demand from almost any source of paper that is at hand - old envelopes and correspondence, failed print-outs, the edge of a newspaper, standard letter paper and more. For practical purposes some of the aforementioned would be best resorted to when no ready cut slips are at hand. If the method is used on any scale, it is best to stock up with a quantity of slips, streamlining the production or making purchasing more economical. I am only aware of two sources of off-the-shelf slips commercially available, which approximates the slips used in this system. One is a thin card which comes either as a pad of single slips (about 15 x 50 mm) or a book of perforated slips, four in a row, and are sold as tips for roll-up cigarettes. You might find them in a tobacconists or a 'head shop'. They are very useful as a pocket pad, but would work out rather expensive on any scale. There are also the very expensive sticky flags and book marks which are roughly the size of the slip described, but its use on any scale would be prohibitively expensive, and they are or course, sticky notes and coloured, both of which you might not desire. Don't worry, you don't have to spend days cutting piles of individual slips with a pair of scissors, though you could (perhaps whilst watching TV?). If you opt for a guillotine you can cut them fairly quickly. You could also get a print shop to cut them for you, and even get them to cut down larger sticky pads into smaller slip pads, which works out cheaper than the above mentioned flags or book marks.
When buying sticky notes it is best to go for quality. By cutting up the notes and reducing the size of each sticky note, they will go a lot further than the full sheet customarily used for a similar purpose, offsetting the extra cost. Cheap stickies do not stick well and loose what little adhesive strength they have after the first repositioning. You could loose valuable information for the sake of a fraction of a penny/cent etc. From my experience the best notes are 3M's Post-its, followed closely by Snopake notes. Both companies have produced recycled paper versions, with Snopake even using off-white, unbleached, un-dyed paper, but sadly have stopped making them. You may still find old stock, or write to the company asking for re-introduction. 3M has a forest friendly paper policy, so it is an acceptable alternative. If you want to be very environmentally friendly you can make your own stickies with paper which still has a blank side and one printed/written side [e.g. old correspondence or failed print-outs] and a repositionable glue stick (by 3M, available in the US, but hard to find in the UK) or pen (avail. in the UK).
Sticky notes are best bought in rectangular pads with the sticky edge along the long side. Watch out; the 2" x 3" Post-its are sticky on the short side. How you decide to cut them and what size you choose for the slip determines which is the best pad to buy. I may also be selling sticky and non-sticky pads shortly if demand makes production viable.
Mapping Diagram Slips
This type of slip is used for such applications as mind mapping and other problem solving techniques, as well as mapping out projects. Because these types of exercise usually involve some kind of brainstorming (even if you are working on your own) and speed is often important to keep ideas flowing, the sticky note may be the better choice. Size depends on space available to spread out and how much information is likely to be represented. If you have a complex project or exercise and a limited board, you may want to make micro slips. Because the information could be a word or a whole sentence it is best to cut these on the fly, as before, filling up a page writing across the pad (sticky strip on the side) then cutting each entry into a slip. There is no need to write on one side only, because any additional information, if any, will be added next to the slip, and it won't need to be held down with a magnet placed on top, though it can still be attached with a magnet - a sticky carrier. The reason for using a sticky note on top of a magnet is a very sound one. Stickies, even quality ones, loose their stickiness quickly if repositioned many times, and also have the tendency to curl. They are quick to attach though. Once the sticky note is slapped onto the magnet base, it can be moved an infinite amount of times, slipped up or over just a little to allow another one to squeeze in. Keeping the slip as small as practicable allows for unforeseen expansion. Using a 1 1/2" x 2" pad is not unreasonable. I have used tiny slivers of paper and still managed to fill a board.
Random Slip
There may be times when you need to capture an idea which is not a straight forward action, maybe the solution to a problem, a sentence or two for a writing project or some practical idea. This is where the random slip is created on the fly. It starts out almost any size. It could be your 3" x 3" jotter cube, a sticky note, a writing pad, the back of a raffle ticket, it doesn't matter. It is whatever is available to capture an idea before it is gone. Fill up a page with random notes, if the ideas keep coming, just separate with a bullet point, a dash, a horizontal line or just a gap. It could be a sketch, a few words or a page. Write the context caption in the margin so that you don't have to read the whole note when sorting the slips. Cut off each entry and put it where it belongs. This works very well for writing projects. It is likely that you think of something when you are not on your computer, or if you write by hand or typewriter and are on chapter three, that brilliant piece of dialogue for chapter seven needs to be captured and stored somewhere. A way to organise random slips will be shown later. It is ideal to recycle paper which is printed on one side as the note may be glued in place later. Indeed, it is best not to write on the back, unless its the only paper far and wide (perhaps you are going for a walk in the woods, where, naturally, your creative mind is in overdrive), as it makes scanning the information more difficult and information could easily be overlooked. If your neat and ordered mind detests random notes - I suspect, reading this, you probably have a craving for order, and maybe even a touch of OCD (takes one to know one, as they say) then one way to capture ideas is to use the lowest common denominator, a small sticky note (1 1/2" x 2") as Andrew Durham shows with his Unfolder Wallet, and keep a supply handy wherever you are. Anything longer than would fit on one note is continued on another and then they are stuck down overlapping each other. There are also re positional glue sticks available in the US (made by 3M) and a pen version in the UK, which may be more convenient for making a few slips or turning a random slip into a sticky note.
Large Slip
Or small pages, depending on your point of view. These are used for a down sized reference system, used like index cards in small filing racks or boxes, or portable cases. They are 1/2, 1/4, 1/8 or even 1/16 (if you like it dinky) of a letter/A4 sheet. This standard size makes it easy and cheap to obtain. Cutting a sheet just requires halving it, maybe repeatedly so. If you want to print a template on them it can be done on the full size sheet, worked out in table cells, printed, and then cut up. Paper is pretty tough, even for reference material, no need for thick index cards which require more resources (are not easily, if at all, available in recycled grade) and bulk up storage unnecessarily. Down to 1/8 (A7) these slips can be punched with a standard two-hole punch. The hipster PDA can utilise this size and be standardised.