Homemade Vegetable Oil Lamp
Page created: 26 January 2008, updated: 20 February 2009
Home made vegetable
oil lamp
If you like candles, live without electricity, or like to have some lighting back-up, you might like this simple little DIY project.
An oil lamp can have a number of advantages over candles and mineral oil lamps:
- very cheap to run - can even burn used cooking oil
- the fumes are less toxic than those of paraffin candles or mineral oil lamps
- the production of renewable vegetable oil is less harmful to the environment than petroleum based products (including paraffin candles)
- for the extreme survivalist, vegetable oil is easier to store in bulk, or can even be produced on the home farm
- due to the wider base, more stable than candles, and the flame of any burning wick falling into the oil will be extinguished
- odour free when using olive oil
Making an oil lamp is very easy, quick and cheap, and gives plenty of opportunity for a creative outlet. The basic element is nothing more than a piece of twisted wire, a length of twine, some vegetable oil and a vessel to hold it all in. The photos pretty well show how to do it, but there are a few tips which might help, and save some trials and errors.
However, if you don't want to mess around with a fiddely job or don't have the tools and materials, you could, instead, buy a lamp or just the holder and spare wicks, as well as a booklet called I Didn't Know that Olive Oil Would Burn from Lehman's if you live in North America. You would be supporting a cottage industry practicing right livelihood. The maker is a small family business in the USA. If you live in the UK you can now buy the lamp or wick holder (made by the same company as the US wick holder) from www.allthingsgreen.net. The lamp is an octagonal jar with wick, wick holder and instruction leaflet and at £5 makes a very attractive and unusual gift even for the tightest budget. It would appear that price even includes delivery.
You Will Need:
- pliers or a vice
- wire cutter (may be part of pliers)
- a nail or similar for shaping the wick holding coil (diameter as wick)
- wire
- vegetable oil
- container
Making the Wick Holder
The wire should be thin and soft enough to bend into a small circle. I had a roll of tinned copper wire from a skip (dumpster), which was just right for the job, but you could strip a piece of electrical wire, or use whatever you can lay your hands on which will do the job. Steel wire of the same diameter is much tougher to bend. It needs to be a little thinner than the wire shown in the photo, which is about 1mm diameter.
Caution when using copper wire - vegetable oil is a fatty acid and when in contact with copper for a while will produce toxic verdigris. I noticed the oil turning blue-green when I used copper wire, probably with verdigris. When using copper wire, to be on the safe side, remove the wick holder when not in use and wipe off any oil to prevent the formation of verdigris.
Caution when using galvanised wire - remove the zinc coating with abrasive paper or a file to prevent toxic zinc vapours. I don't know if the lamp flame is hot enough to vaporise the zinc coating, but I'd do it as a precaution anyway.
Work out the length by using a piece of twine, wrapping it around the nail about 4-6 times, then tracing the height, the radius of the base, the base circle and the handle. As a guide, the simple holder seen in the photo here is made with a piece of wire about 35-40cm long.
The height is determined by how much oil you want to have in the container. The top level of the oil should always be fairly close to the bottom of the wick holding coil. The wick needs to be drenched with oil at all times, or it will be consumed too fast. If the oil is too far below the flame, the oil can not be wicked up as fast as the flame is consuming it. To avoid the constant need to top up the container, the surface area should be greater than the height, i.e. a wide, shallow container is best. Alternatively, drop some pebbles or marbles into the oil to raise the level as the oil is used up.
The handle allows the wick holder to be removed from the container for lighting, and should be long enough to avoid burning your fingers when replacing the holder. If the container is narrow, the handle needs to extend over the edge. If the handle is likely to be heavier than the holder and base, then the base needs to be counter-weighted by wrapping another turn of wire around the base. The shape of the handle will be determined by the dimensions of the container. If the container is wide enough to allow the handle to be inside it without the risk of getting burnt when grabbing the handle, then the handle should be below the rim so that the lid can be placed on the jar when not in use.
Start shaping the wire by holding one end of it against the nail with pliers or a vice, and twist the wire around the nail a few times, until you have a coil about 1cm long. Hold the end of the coil with pliers whilst bending the wire parallel with the nail to form the stem, then bend at right angle and follow the shape on the photo, doubling up the base loop if necessary.
The Wick
Most plant fibre twine should work. I used cotton twine, but you could experiment with sisal, jute, hemp, flax, nettle or any plant bast fibre. It should be absorbent and reasonably smooth, which may precludes sisal, jute, and other rough cordage. If you have some handy, and nothing better suited, give it a go anyway. A length of about 40cm will make a reasonable length of wick. Twisting the wick is a bit tricky, and a job best done with another person, though you can hold one end in your teeth as you twist the other end, or tie one end to a door handle or chair leg or whatever, but allow extra length for tying. Twist it under tension until the twine becomes quite hard, then grab the middle, and bring the ends together, still under tension, then let go of the middle, an the two ends will twist around each other to form a thicker, denser cord.
Now feed the twisted end through the wick holding coil from below, until it sticks out about 6mm. The burner element is now finished. Tip: if the wick won't easily go through the coil (it should be tight enough to prevent it dropping out), twist the wick as you thread it in, to firm it up.
Container
You can use any glass jar which gives enough clearance for the flame, any clearance above 4cm should be safe . As stated earlier, the proportions should be more width to height to avoid frequent refuelling. Think of Roman oil lamps, they were shaped like a shallow gravy boat. If the container is shallow enough for the flame to be above the rim, the container can be of opaque material, like a terracotta dish or heavy saucer.
If you use pebbles to raise the oil level, you may want to use a saucer under the lamp or a small additional dish to keep the oily pebbles after topping up with oil, maybe also a spoon for retrieving the pebbles.
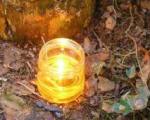
For outdoor lighting it is best to use a sheltering glass container. It is also easy enough to make a portable lantern by wrapping some wire around the neck of the jar, include some loops and hook a long handle into the loops. If the flame is too hot under the hand, you could put the lid onto the container after punching a few holes into it. The beauty of this kind of lantern is that the flame can shine through the base of the jar too, casting more light underneath - good for walking with the lantern.
Oil
Now you may be thinking, burning vegetable oil must be very smelly. Some oil may be, but olive oil burns very clean and without odour. Smoking oil smells unpleasant, but burning oil does not. So forget the stench of a smoking frying pan. However, even the smellier types of oils can be used economically outdoors. Perhaps you have a bottle of forgotten salad oil at the back of the cupboard. Here is some use for it. Or how do you get rid of the deep frying fat after making a few batches of chips (French fries)? Light your porch, patio or garden path. You could even collect waste oil from fast food joints. Strain it and use it for your lantern. You could also add a few drops of essential oil for a scented light. The volatile oil will evaporate easily with the nearby heat, before the flame can actually burn it.
Using the lamp
The first time the lamp is used the wick should be allowed to fully absorb oil before lighting it. Keep the wick about 6 mm long, and make sure the oil reaches to just below the coil. If the holder is in a jar, lift it up to light the lamp. When the flame shortens it is a sign that the wick is also shortening, and it should be pulled up a little with a pin or tweezers. Remove any charred wick. The wick should not burn very fast. If it does, then the oil level may be too low. Top up or drop in a pebble. It is also best not to extend the wick too far, as a large flame is more likely to smoke. To extinguish the flame use a candle snuffer, purpose made or improvised, or if the handle is inside the jar as suggested earlier, just place the lid on the jar. This will prevent any smoking. Alternatively, the lamp can be tilted and the holder tipped over to submerge the flame into the oil, which will instantly, and smokelessly extinguish the flame.
Update
Thanks to all those who commented, and a special thanks to those who suggested some great ideas. Prompted by the idea for a floating can base I made one which is shown in the last photo below. The can base was cut off with some old scissors (careful - very sharp edges). I then bent the edge over with some pliers to make handling safer. I pushed a nail through from the bottom to make a hole for the wick. The resulting prongs which are sticking up will prevent the wick from slipping down. The hole should not be too tight though, so that the wick can be pulled up as it burns down. There is no floating material underneath like polystyrene. I found the domed base to be enough, however, the sides could be a little higher, as the oil level comes too close to the edge, and the slightest tilt will sink the holder. Adjusting the wick length will be trial and error.
Ellie commented with a great suggestion for a wick - an old cotton shoe lace.
The comments have been disabled on this page as it had to be moved. I will try to extract all the good ideas and write an update with them when I get around to it.
For a discussion on various waxes and oils, toxins and environmental impact, go here.
Other Uses
A light in a shallow container with a trivet above could be used to keep food warm on the table, the way that tea light candles are used. Several flames may even be hot enough to do a little cooking or heating water, or pre-heating it.
Click thumbnails to enlarge, click popup to close
Tools and materials
Hold end tightly and twist wire around nail
Pull tightly and twist
Continue wrapping wire around nail
The wick holding coil completed
Holder completed
Holder, cotton twine and twisted wick
Burner element complete with wick
Oil level just below the wick holding coil
Floating wick holder
Related Articles

Free creativity guide to help you solve problems and design anything.

If you also want to design a solar system, you can use the moon!